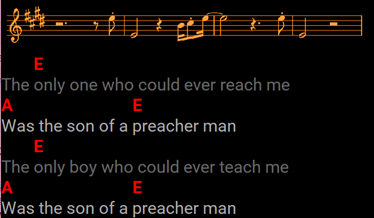
If you want to show snippets of sheet music (or any other graphics) in your songs, you can embed pictures in your songs.

These pictures need to be in the JPEG or PNG format, and they should be sized so they fit on your screen, at least horizontally. LivePrompter will take the height of these pictures into account when calculating its scrolling speed.
Important: LivePrompter doesn’t automatically scale pictures to fit the screen – anything that is too large will be brutally cut off. So experiment with the pixel width for your pictures that fits your screen size and create all your pictures at the appropriate size. As a rule of thumb, a width of 800 pixels should fit on a typical 10 inch tablet. If you have high-resolution pictures that are too large for the screen, you can use the
{picturesize:...}tag before that picture to scale them down (see below)
It makes sense to create your pictures with a black background, so they don’t stand out too brutally on the dark screen background. As a special service, LivePrompter will invert your pictures when you use Light Mode, so things are readable on a white background when you have an outdoor gig.
New: Some users are using pictures that aren’t created with a black background – for these, it is less helpful to invert them in Light Mode. For these users, version 1.4.6 introduces a new option in Settings –> Colors (light mode): at the bottom of that settings page, you now have a switch that allows you to turn this inverting off.
After you have created your pictures, create a “Pictures” sub-directory of your home directory (where your songs live) – this is where LivePrompter will look for any pictures referenced in your song files.
Then, you can use {picture:...} tags in your songs to place these pictures. Make sure you type the exact file name of your picture, including the extension (.png or .jpg). If you have pictures that are only relevant for an individual musician, you can also use the {custompictureX:…} tag (with X being the “custom” number for that musician, just like for custom comments. These pictures will then only be shown when ShowCustomComments is set to include that number in LivePrompter.ini.
If you are using pictures on multiple devices with different screen sizes, it is best to create your pictures at the right width for the largest device and then use the “Picture Size” setting in LivePrompter’s Song Display settings – it allows you to scale your pictures as a percentage, so when set to 100, pictures will be shown at their full size. Setting Picture Size to 50 will mean that all pictures will be scaled to half their size.
As an example, I create all my pictures for a maximum width of 800 pixels; on my 10 inch tablets, I set Picture Size to 100, and they all fit nicely. On my mobile phone, I set Picture Size to 47, which makes my pictures fit that screen (although my notation snippets get reaaaally small on my mobile screen, so they aren’t very useful anymore 😉…)
Note: loading and resizing pictures can slow LivePrompter down quite a bit when loading a song, so use this function with care and don’t go crazy. Just small snippets are usually best – if you need fully scanned sheet music, you’ll probably be better off using a specialized tool for that.
Here are the relevant tags:
| {picture:filename.ext} or {p:filename.ext} | Use this to include a picture file (usual file formats should work) in your song. The picture needs to be saved in the “Pictures”subfolder of your LivePrompter songs folder. And be sure to include the extension (.png, .jpg, etc.) |
| {custompicture0: filename.ext } or {cp0: filename.ext }, … {custompicture9: filename.ext } or {cp9: filename.ext }, | This works like customcomment: choose an individual number from 0 to 9 to embed pictures that will only be shown to individual musicians (guitar tabs, drum patterns, …). This tag uses the same numbers as customcomment, so you use “Show Custom Comments” in LivePrompter settings to select both comments and pictures. |
File Name Capitalization
Another important note for all you LivePrompter Classic users coming from the Windows platform: unlike with Windows, on Android and iOS, capitalization matters for file names. So “my great song.jpg” and “My Great Song.jpg” are two different file names. So whenever LivePrompter displays something like “can’t display ‘my great song.jpg'” in your songs, check if you have the correct spelling, extension and capitalization of your file name in the
picturetag.
Scaling Pictures
The best solution usually is to reduce your pictures in size so they fit on the screen before adding them to LivePrompter – less work for LivePrompter to do, and therefore smoother operation and faster loading of songs. But if you need to quickly solve an issue with a picture that’s too large or too small, you can add a {picturesize:xxx} tag before the picture in your song file. All pictures after this tag will be scaled according to the number xxx, with 100 meaning 100%, so no scaling. So if you want to reduce a specific picture to half its size, add a {picturesize:50} before it – and don’t forget adding a {picturesize:100} after it to avoid affecting other pictures in your song.
