Why Multiple Configurations?
As long as you use LivePrompter for one band/project and one person on a device, you may never feel the need to have multiple configurations of LivePrompter on the same device. But once you use LivePrompter for multiple bands/projects or if you want to share tablets between multiple musicians, you’ll be wanting to look at LivePrompter’s “Profiles” feature.
A Profile is essentially a package of all the settings you have made in LivePrompter’s settings pages, plus the selection of a “Source” (more on sources later). So whenever you load a Profile, LivePrompter will make the corresponding settings like text colors and sizes, showing or hiding chords, selecting custom comments and transpositions, header/footer size, etc.
Multiple Configurations with the Same Source Material.
Let’s assume you’re in a band, sharing one Dropbox folder of song material. With this material, you are working with custom comments / custom transpose or capo settings for individual musicians, and individual band members may use different settings for text colors, scrolling, etc. Now you can have a tablet with Profiles for each band member configured (with each Profile having a different setting for “Use Custom Comments”, colors, etc) to quickly use as a backup for individual band member’s tablets. I usually carry one or two such backup tablets around for a gig – just pull it out, select the correct Profile, and you’re done!
Also, I can easily check how a song file looks for the guitarist or the singer – just switch to a Profile with their settings and see how it looks for them. Pretty nice if you are the person doing all the editing…
Multiple Configurations with Different Sources
When using LivePrompter in different bands, you will have multiple home directories in your Dropbox – one for each band/project, so you keep your songs and setlists nice and separate. Now you create separate Sources in LivePrompter, each linking to their specific Dropbox folder and create different profiles, each linked to a different source. Now switching LivePrompter between bands just means selecting the correct profile, and you’ll see the correct songs and setlists for each band.
Creating and Managing Profiles
You manage Profiles in LivePrompter’s settings page:
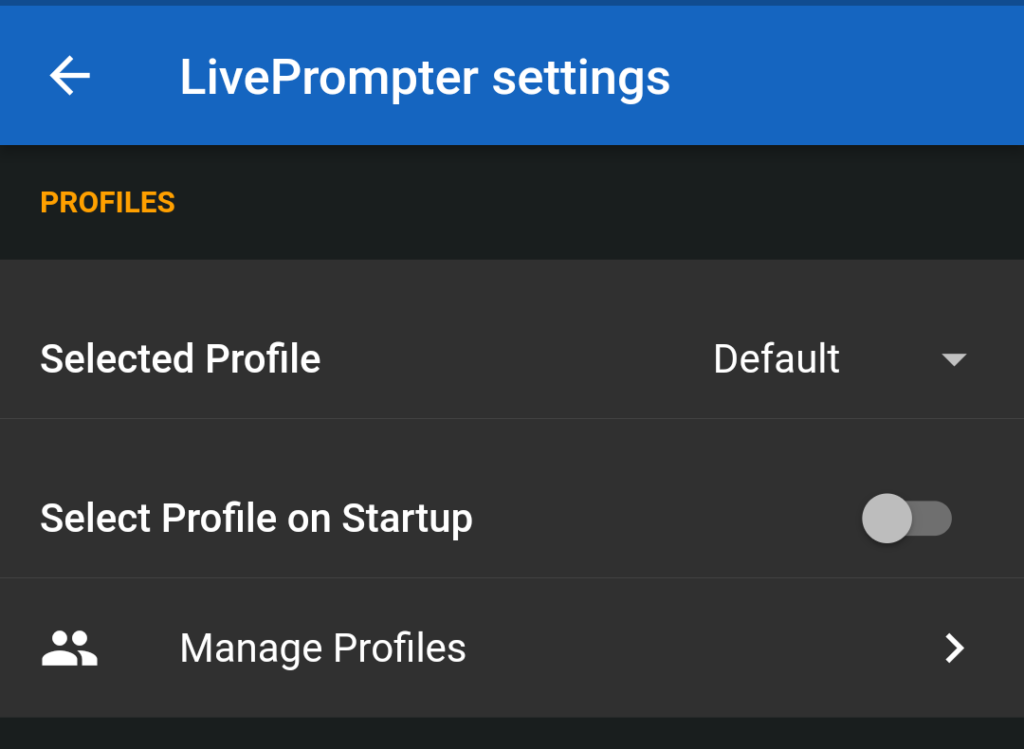
- Selected Profile: gives you a drop-down menu with all Profiles created on this device. When you select a Profile from the list, it gets loaded immediately (don’t worry, all changes that you’ve made to the current Profile are saved).
- Select Profile on Startup: when you set this switch to “on”, LivePrompter will always prompt you to select a profile when you launch it. This comes pretty handy for devices shared between band members
- Manage Profiles: opens the “Manage Profiles” page that allows you to add, delete or rename Profiles
Initially, LivePrompter starts out with a profile called “Default” (but no worries – you can change its name and create new profiles).
All changes you make to LivePrompter settings are made to and saved with the currently selected profile. When you select a different Profile, its settings will be loaded, and all changes you make will then apply to that profile.
Note: there is no explicit “save” function – all settings you make are saved automatically to the current profile.
The Manage Profiles Page
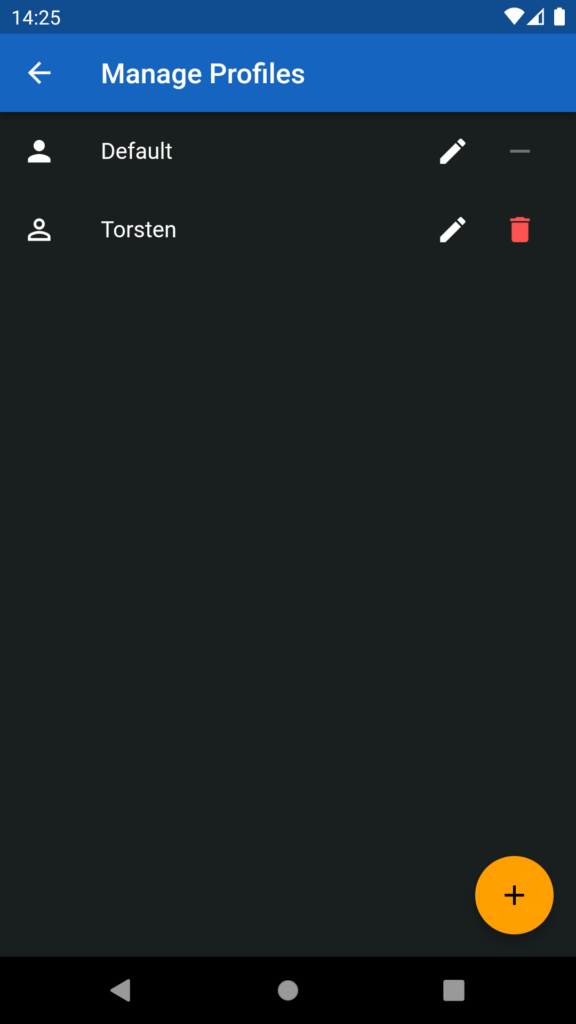
This page lists all configured Profiles you your device. The currently selected Profile is marked with the solid icon on the left.
- Activate a profile by tapping on it (new in v 1.2.1)
- Rename Profiles with the “pencil” icon
- Delete Profiles with the “trash can” icon – note: for technical reasons, you can’t delete the currently loaded profile
- The big and friendly “plus” button allows you to create a new profile, set its name and choose if the new profile should be based on default settings or on the currently selected profile (this comes in handy if you’ve made a lot of specific settings on scrolling, sizes and colors and simply want to create a new profile to link to a different Source
Copying Profiles
With version 1.0.1, LivePrompter introduced the capability to copy profiles. This is not only helpful when creating new profiles, but also to export and import saved profiles.
To copy a profile in the Manage Profiles page, you simply long-press a profile in the list (press-and-hold). LivePrompter will inform you that the profile has been copied to the clipboard.
When you create a new profile (using the “plus” button), LivePrompter will check if there is valid profile data on the clipboard, and – if yes – ask you if you want to use this data to create the new profile. If you answer “yes”, the new profile will be created using the data from the copied profile. So all the settings you have made in the original profile (sizes, scrolling, colors, …) will be used to create the new profile.
Note: if you say “yes” to using the data from the clipboard, LivePrompter will leave the data on the clipboard, so that you can use it to create another new profile. If you answer “no”, the data will be discarded, so you’ll not be asked again for subsequent profile creations.
You can not only use the “copy” function to create new profiles from existing ones, but also to save your profiles outside LivePrompter, and to re-create saved profiles (e.g. to copy your settings to a new device):
- copy a profile to the clipboard using a long press in the Manage Profiles page
- go to an app that you want to use to store your profile data (text editor, email app, Google Keep, …) and paste the text there. Now you can see what a profile looks like inside😉
- Store the text wherever you want to keep it. Preferably somewhere where you can also open it on a different device, if you want to transfer profiles – maybe just mail it to yourself?
- When you want to use your saved profile data, simply open the app where you’ve stored the profile data, copy ALL the text to the clipboard, go to LivePrompter’s Manage Profiles page and click the “plus” button. If LivePrompter recognizes valid profile data on the clipboard, it will ask you if you want to use that data to create your new profile.
Note: Now that we have this “copy/create” functionality, LivePrompter will no longer ask you if you want to use the currently selected profile when creating a new one – that original functionality has been superseded by the new “copy/create”. I’ll strike out that part of the manual once the update is fully rolled out…
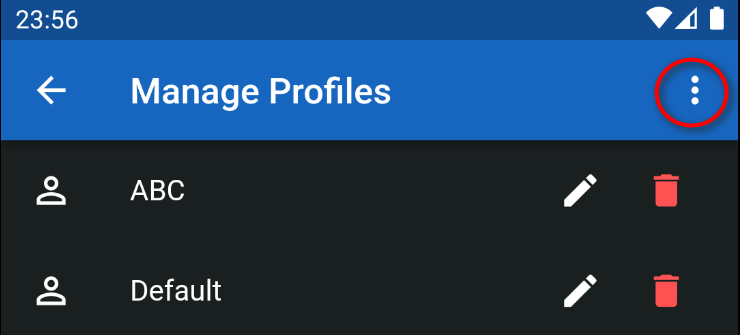
Creating Profiles From Text Files In Your Sources
If you regularly install new LivePrompter devices for multiple band members, making all the settings over and over again gets a bit tedious, so I wanted to streamline the process a bit. Starting with version 1.2.0, you have the option to import profiles from your Dropbox source. These profiles need to be saved in (surprise!) text files (ending in “.txt”) in a subdirectory of your Dropbox Folder called “Profiles”. Once you have synchronized your Dropbox files, you can create new profiles from text files in your Profiles subdirectory using the Manage Profiles page, which now has a new popup menu item at the top right:
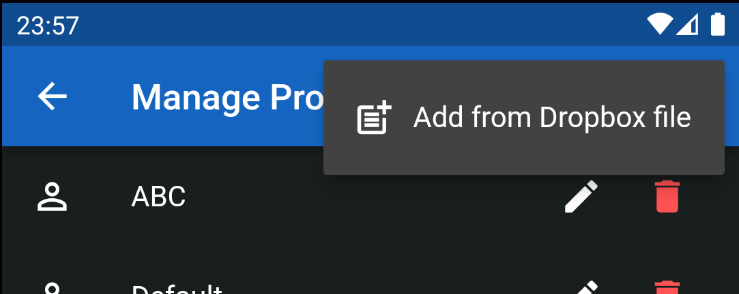
Now you can choose one of the profiles in your sources and create a new one based on that. If the file doesn’t have the correct structure and syntax, LivePrompter will complain and refuse to create the profile, so be careful with your files. Ideally you create them by copying an existing profile and saving it as a text file. So the general approach is:
- create your standard profiles on one device – it should be “typical” for the devices you use in your band, regarding screen size and resolution, so that the settings you make translate well to other devices
- go to the Profile Manager page and copy the profiles one by one, using a long press on the profile name, then pasting them to a place where you can use them to create text files. For example, paste them to an email you send to yourself 😉.
- On your PC, create a “Profiles” subdirectory in your Song Folder and create text files for your re-usable profiles; paste your profile data from your emails to these text files (one text file per profile, please!).
- Make sure your text files use the correct encoding (UTF-8) – see this article.
- On any new target device, start by creating your source and syncing it, so you have the files on your device. Now you can create your standard profiles as shown above.
If you understand the file format and know what you’re doing, you can of course edit the settings for new devices directly in these text files – use at your own risk!
Still a bit convoluted, but you get used to it – if you have suggestions how to improve on this, let me know!
Managing Sources
A Source is essentially two things:
- A description of where your files are in your Dropbox
- The local copies of your dropbox files on your mobile devices
So when you create a Source, you tell LivePrompter where to find your files in your Dropbox (the “Dropbox Folder”) and where to put them locally (the “Source Name”).
Note: the “Dropbox Folder” describes the path to your LivePrompter files within your Dropbox folder on your PC. So if your main Dropbox folder is “C:\Users\joe\My Documents\Dropbox” and LivePrompter data sits in “”C:\Users\joe\My Documents\Dropbox\Music\LivePrompter”, your Dropbox Folder is “Music/LivePrompter”.
Since we don’t want to create chaos in the local file system on your device, you can’t change the name of your Source after you’ve created it, but you can change the Dropbox path (e.g. in case you’ve made a typo and Dropbox sync doesn’t work).
LivePrompter can only manage one Dropbox connection, so all Sources need to be folders in the same Dropbox – you should use Dropbox folder sharing if you need to bring different projects together in one Dropbox.
Note: Whenever you synchronize your LivePrompter files, all Sources will be synchronized.
Sources Settings
The Sources settings are at the bottom of the Settings Page (“Dropbox Data”):
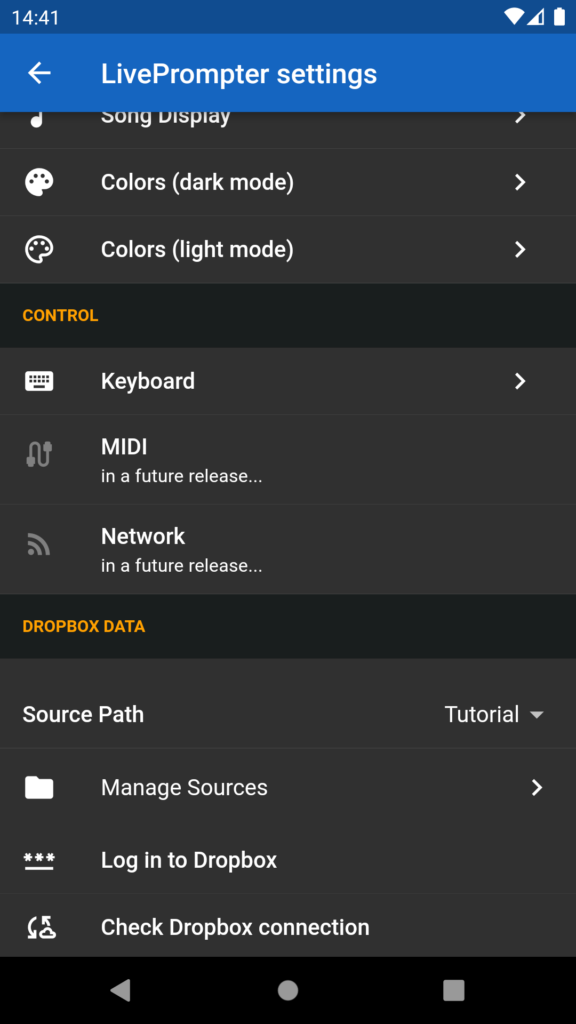
- Source Path: lets you select the Source for the current Profile – remember: the selection of a Source will be saved with a Profile
- Manage Sources: opens the Manage Sources Screen to create new and edit / delete existing Sources
- Log in to Dropbox: initiates the OAUTH authorization process as described in “Installation and Initial Configuration“
- Check Dropbox connection: checks if there is a Dropbox authorization token stored in LivePrompter and pops up a quick message with the result
Note: if no Source is selected (Source Path: – none -), LivePrompter can’t show any songs, books or setlists. So if you run into a pretty blank screen even after having created and synchronized a Source, check if it is actually selected as “Source Path”.
The Manage Sources Page
This page looks pretty much like the Manage Profiles page: it lists the Sources currently available on your device (with the active Source highlighted with a solid icon).
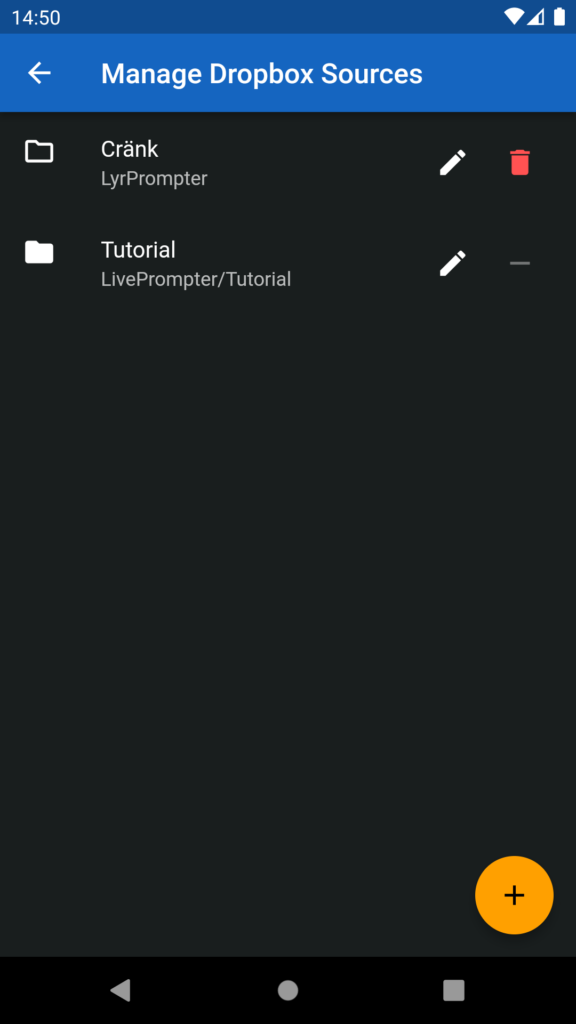
- Select a Source for the current Profile by tapping it (new in v 1.2.1)
- Change the Dropbox Path of a Source with the “pencil” icon
- Delete Sources with the “trash can” icon
– note: for technical reasons, you can’t delete the currently loaded Source(this restriction was removed in 1.2.1) - Create new Sources with the “plus” button
Switching Profiles
There are three ways to switch profiles:
The first is the one we’ve seen in this article so far: go to the settings screen and select a different Profile at the top – done!
The second is a shortcut: when you open the “Drawer” on the Home Screen (by tapping the top-left Hamburger Menu Button), you can double-tap the blue header area of the Drawer. This will then open the “Select Profile” Screen:
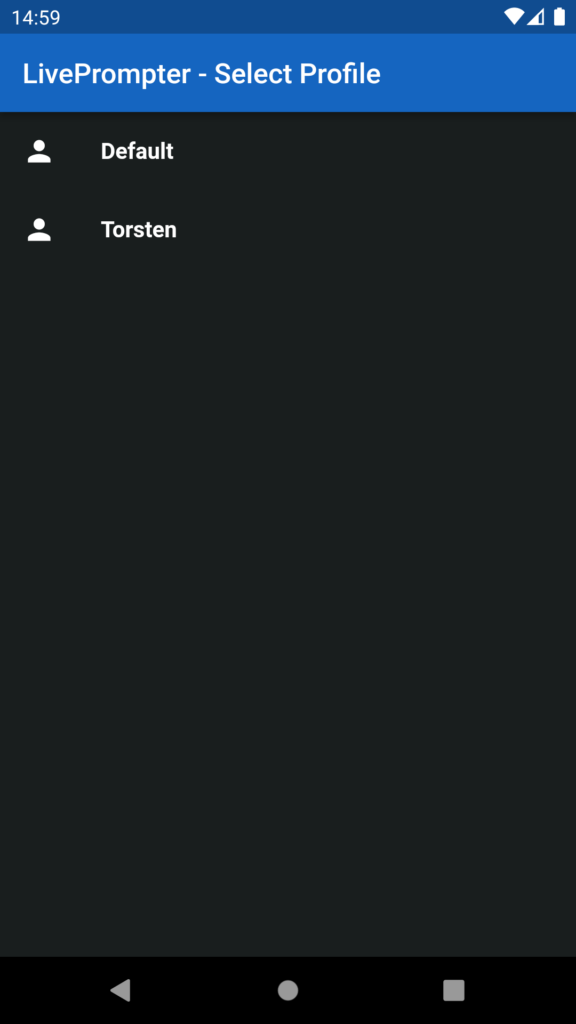
Then just tap the profile you want, and you’re done.
Lastly, you can activate the option “Select Profile on Startup” in LivePrompter’s settings. Now, every time you start LivePrompter, it will display the “Select Profile” Screen and you can choose which Profile to start LivePrompter with.