Note: this feature is new with LivePrompter mobile version 1.3.x and higher
MIDI control was the first means of “remote control” with the original LivePrompter “classic” version for Windows, and it is still the only way to communicate between LivePrompter classic devices and the rest of the world.
With LivePrompter mobile focussed on mobile phones and tablets, my immediate priority was to enable more direct wireless means of connectivity, so my first focus was on LP Connect and Cantabile Connect, but to keep the mobile version fully compatible with its Windows counterpart, I just couldn’t leave MIDI connectivity out. So here is MIDI Control!
How it works
When you provide your device with a MIDI interface and activate MIDI, LivePrompter will be able to both send commands to connected MIDI devices, and react to MIDI commands received from other devices.
- Program Change commands (including Bank Select if needed) can be sent when you open a new song. You can use this to select a preset on a connected MIDI keyboard or guitar amp simulator to be ready to rock right away.
- Note On or Control Change commands can be sent whenever a button on the song screen is activated (either by tapping it or by any other means of control like external keyboard, LP Connect, Cantabile Connection or even MIDI). You can use this to e.g. start playback on an audio file player in sync with starting scrolling.
- When LivePrompter receives a program change command, it will display the corresponding song (I’ll tell you later how to map songs to program changes…)
- You can also map Note On or Control Change commands to the song screen buttons, so you can control LivePrompter from your MIDI controller without touching the screen.
Note: due to constraints in the underlying Flutter MIDI library, LivePrompter can only use one MIDI device; you can’t have different MIDI devices for input and output. LivePrompter cannot address individual ports inside multi-port interfaces; it will always receive from all ports and send to all ports. It can also not directly use “network MIDI” functionality (rtpMIDI), which Android doesn’t support natively. But you can work around a lot of these issues with a separate app called MIDI Hub by Abraham Wisman – highly recommended if you want advanced MIDI routing, Bluetooth MIDI or rtpMIDI!
Setting it up
OK, head to LivePrompter’s settings page and tap “MIDI” in the “Control” section. Now first set up the fundamentals at the top of the page.
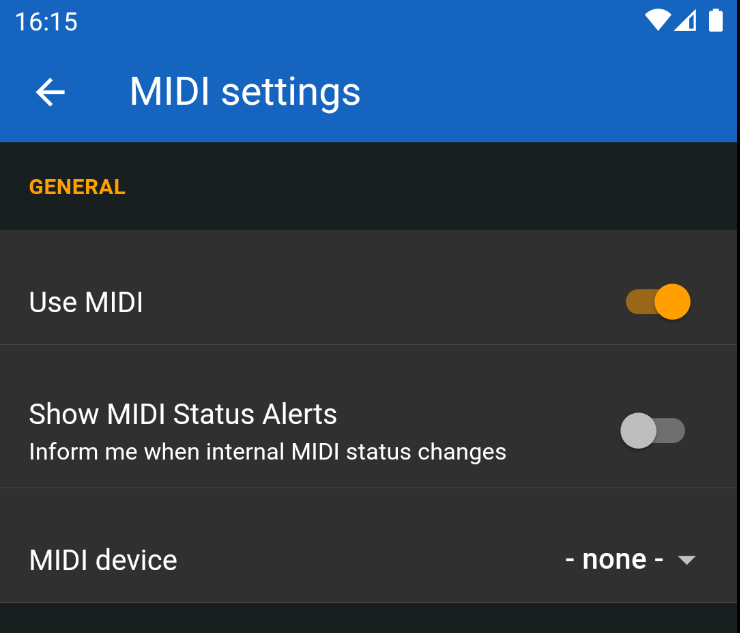
- Use LP MIDI: turn the MIDI function on or off. Nothing will happen if you don’t turn this on 😉.
- Show MIDI Status Alerts: when this is set to “on”, you will get some status message popups when internal events occur in the MIDI engine, like MIDI commands received or connections made. This can help during initial experimentation and setup – once everything is running smoothly, you can turn it off.
- MIDI device: select the MIDI device you want to use for MIDI input and output
Once you make these settings and exit from the Settings page, you should see a MIDI icon in your status bar. It will be “struck out” initially, and then un-crossed when MIDI connection is successfully established.

You can also tap this icon to reset the MIDI connection. This can be useful if things have somehow become messed up and you want to start with a clean status.
Input settings
Here you make all the settings for reacting to MIDI data that LivePrompter receives
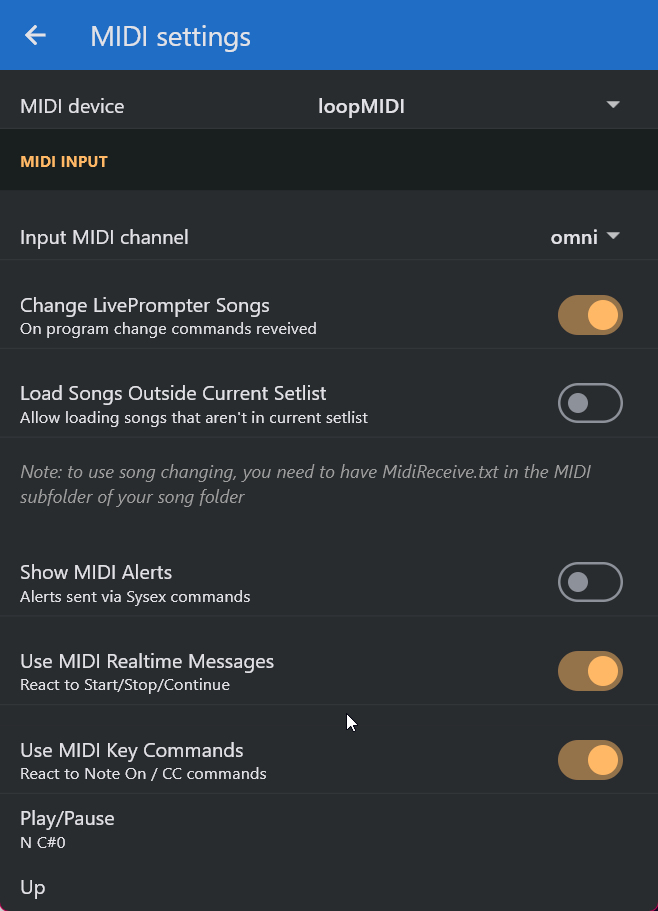
- Input MIDI channel: if you want, you can have LivePrompter only react to MIDI commands with a specific MIDI channel. Select this channel (1…16) here – or leave it at “omni”, which means that LivePrompter will react to commands sent on any MIDI channel.
- Change LivePrompter Songs: this is probably the most commonly used remote function – when receiving a Program Change command, LivePrompter will open the corresponding song if this is set to “on”, otherwise it will ignore all Program Change commands.
- Note: you need to associate Program Change commands with your song files using the file “MidiReceive.txt” in a “MIDI” subfolder of your song folder. See below on details.
- Change Setlist to “All Songs” if needed: initially LivePrompter will look for a song within the currently loaded setlist when receiving a Program Change. If this song can’t be found within the current set list, but exists in “All Songs”, LivePrompter will automatically load the “All Songs” setlist and switch to that song.
- Show MIDI Alerts: there is a special form of System Exclusive (SysEx) MIDI commands that LivePrompter recognizes to display quick alert messages at the top of the screen. There’s a separate article on how to compose these and use them. Here you can choose to display these messages or ignore them.
- Use MIDI Realtime Messages: setting this to “on” will make LivePrompter react to the standard MIDI transport messages “Start”, “Stop” and “Continue”. Sending “Start” will make LivePrompter jump to the top of the song and start scrolling (a combination of the “Reset” and the “Play” button). Sending “Stop” will pause scrolling when LivePrompter is scrolling, otherwise it will be ignored. Sending “Continue” will start/continue scrolling when LivePrompter is in “Ready”, “Paused” or “Waiting” mode. Note: these realtime commands do not have a MIDI channel contained in them (that’s just the MIDI standard), so it doesn’t matter what input MIDI channel LivePrompter is set to for these messages.
- Use MIDI Key Commands: if you turn this on, LivePrompter will check all received Note On and Control Change commands if they fit the specifications made below and, if they fit, trigger the corresponding button function. When this is turned off, all Note On and CC commands will be ignored (except Bank Select). You’ll need to define the specific note or CC in the individual settings (Play/Pause, Up, Down, …); if you leave a setting blank, the corresponding key will not be triggered by MIDI.
MIDI notes will be recognized if they have a velocity > 0; CC commands will trigger on any CC value > 0 (so you should really only use CC commands with buttons, not with sliders, because the multiple values sent out when you move a slider will create massive confusion for LivePrompter).
To define Notes and CCs, enter text as follows:- “Note by Note Name”: write “N ” and then a MIDI note name, consisting of the base note and the octave. “Middle C” (note number 60) is C4 (I know there is some debate on the “correct” number for middle C, but as a pianist, I’m just counting C’s on a piano keyboard, and middle C is the 4th C, so there you go…).
LivePrompter only recognizes sharps, not flats in note numbers, so you’ll have to type A# to get Bb, but I guess you can handle that… - “Note by Note Number”: write “N ” and then a MIDI note number from 0 to 127. Middle C is 60 – no ambiguity there 😉
- “Control Change with CC Number”: write “CC ” and then a controller number. CC number range from 0 to 127 – but don’t use 0 or 32, since these are reserved for Bank Select messages. Everything else is fair game…
- “Note by Note Name”: write “N ” and then a MIDI note name, consisting of the base note and the octave. “Middle C” (note number 60) is C4 (I know there is some debate on the “correct” number for middle C, but as a pianist, I’m just counting C’s on a piano keyboard, and middle C is the 4th C, so there you go…).
Output settings
Here you make all the settings for sending out MIDI data from LivePrompter
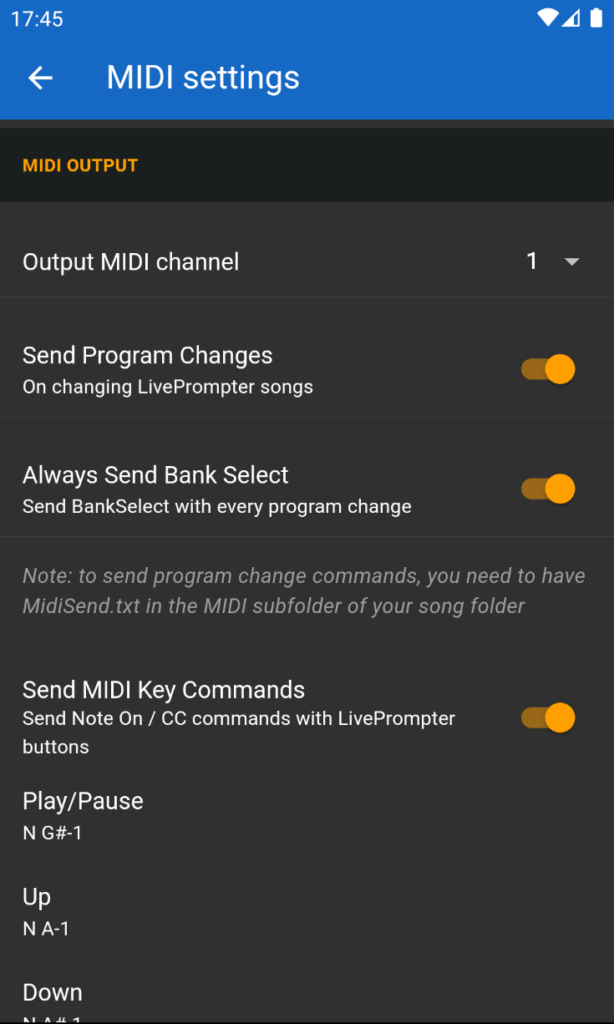
- Output MIDI channel: Select the MIDI output channel (1…16) here – no “omni” here; you need to decide which channel to send your data on.
- Send Program Changes: Set this to “on” to have LivePrompter send a (banked) program change whenever you open a song.
- Note: you need to associate Program Change commands with your song files using the file “MidiSend.txt” in a “MIDI” subfolder of your song folder. See below on details.
- Send MIDI Key Commands: if you turn this on, LivePrompter will send out Note On or Control Change commands whenever a key on the Song Screen is activated. You’ll need to define the specific note or CC in the individual settings (Play/Pause, Up, Down, …); if you leave a setting blank, no MIDI command will be sent on that key.
MIDI notes will be sent with a velocity of 127, and corresponding Note Off commands will be sent right after them to avoid any “stuck” note issues. CC commands will be sent with a CC value of 127. To define Notes and CCs, enter text as described in Input Settings.
Mapping songs to program changes
LivePrompter needs to know which program change will activate which song or which program change to send when a song is loaded. I considered building this into the song files themselves, but found it easier to manage with a separate file that keeps all the information organized in one place.
So this mapping is defined in two files that reside in a subdirectory of your song folder called MIDI which contains two text files, called “MidiReceive.txt” and “MidiSend.txt”. These are the same files also used by Cantabile Connection.
Note: To avoid issues with international characters, be sure that they are coded as UTF-8 (same as your song files). Also upper/lower case are relevant, so be careful with that!
Also note: a nasty issue that pops up frequently is editors automatically replacing straight apostrophes with “smart” apostrophes in your text files. This will break the connection between filenames and songs, so look for that if things don’t quite work…
Each of these two files has the same layout: one line for each mapping that looks like this:
{Bank}.{Program},{SongName}
or simply
{Program},{SongName}
The “SongName” is the file name of the song, without the “.txt” extension. Be sure to use the file name and not the song title.
The “Program” is the program change number, a number between 1 and 128.
Since MIDI program changes are restricted to 128 different programs, LivePrompter also allows multiple banks of programs to break this limit. MIDI-wise, this means that a program change is preceded by two bank select commands, namely “bank select MSB” (CC 0) and “bank select LSB” (CC 32), which together tell the recipient of the messages that it should call up the respective program in the addressed bank.
To keep things simple, I’ve avoided the mess with MSB and LSB and simply put in a combined “bank” number. This bank number is created from the MSB and LSB values like this: MSB * 128 + LSB. If you want LivePrompter to send bank select MSB 3, LSB 5, the correct bank value is 389. More detail on bank select can be found here.
So this is what a MidiSend.txt file could look like:
0.1,Addicted To Love
0.3,Angels
0.4,Another Brick In The Wall
0.5,Behind Blue Eyes
0.7,Brown Sugar
Or alternatively:
1,Addicted To Love
3,Angels
4,Another Brick In The Wall
5,Behind Blue Eyes
7,Brown Sugar
if you only have 128 or less songs in your list.
Sending Program Changes
When loading a song, LivePrompter will scan through the list of program changes defined in “MidiSend.txt” and try to find a song name that is identical to the file name of the song being loaded. If it finds one, it will send a program change (and, if necessary bank select commands before) via MIDI.
This will even work for “divider” or “instruction” setlist entries that don’t reference a “real” song file – entries like “— Set 1 —”. If you enter this as a song name in “MidiSend.txt”, Live Prompter will also send the respective program change when you get to this point in your setlist. Nifty, huh?
Receiving Program Changes
When LivePrompter receives a MIDI Program Change, it will use the program number and scan through the list of program changes defined in “MidiReceive.txt”.
Once it finds a correct program change / bank combination, it will look if its current setlist contains the name referenced. If yes, it will load the corresponding song. It will even automatically open the song window if it isn’t open yet.
Song-specific custom MIDI commands
This is a new feature, introduced in version 1.4.6.
Some users asked to have more options than just sending a program change message when loading a song, e.g. to set up their MIDI-controlled equipment (virtual guitar amps, keyboards, voice processors, etc.). To enable this, I created two new tags: {midi: xx xx xx xx ...} and {custommidi#:xx xx xx xx ...} or short: {cmid#:xx xx xx xx ...}.
These two tags allow you to specify “raw” MIDI messages to be sent when loading a song. These messages are defined in a chain of hexadecimal bytes, separated with spaces. For example, sending first a program change #7 on MIDI channel 1, followed by a volume setting to a value of 64 on the same channel (volume is CC 7), this would look like this:
{midi:C0 06 B0 07 40}Note: program changes and MIDI channels are typically counted 1..128 and 1..16 respectively, but in “raw” MIDI data, they are counted 0..127 and 0..15. So hex C0 means “program change on channel 1”, C1 means “program change channel 2” etc. And to select the first program, you’ll have to create a program change with value 00, so C0 00 will select the first program on channel 1. Confusing, I know, but that’s MIDI…
The second command (custommidi) is relevant when multiple musicians are sharing the same LivePrompter files via a common Dropbox folder. In that case, the guitarist may want to send specific commands to set up his guitar rig, while the keyboardist wants to select the right programs on her keyboards. In that case, they will use the custommidi (or short: cmid) tag with different numbers, e.g. 1 for the keyboardist and 2 for the guitarist. So the song file will have cmid tags for both of them, and LivePrompter will send the correct command depending on the settings made in “Settings –> MIDI”:
{cmid1:C0 0B}
{cmid2:C1 03 C2 05 B1 50 01 B2 50 00}
If you have multiple midi or custommidi tags in your songs, the content of these will be concatenated and sent out in a long MIDI message when loading the song – so no MIDI commands in the middle of the song at specific times… But this concatenation can be quite helpful breaking down more complex MIDI messages, e.g.:
{midi: C0 0B}
{midi: B0 50 01}
{midi: B0 07 40}Settings for song-specific commands
To control the usage of these tags, there are some settings in the MIDI section of LivePrompter’s settings:
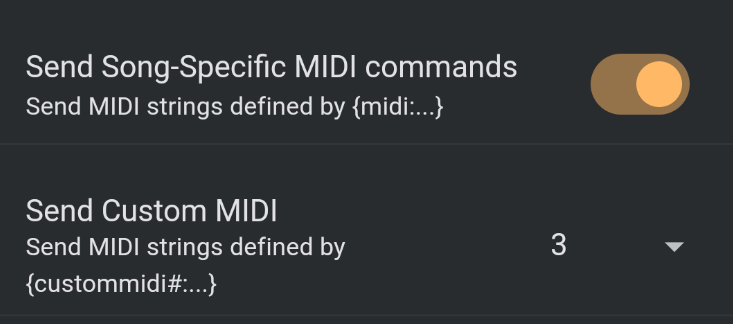
The first setting allows you to activate or de-activate the sending of the MIDI commands defined by the {midi:...} tag; the second setting allows you to specify which custommidi tags should be used (or you can select ‘- none -‘ to deactivate all custom MIDI).