Note: this feature is new with LivePrompter mobile version 1.2.x and higher
After building Cantabile Connection, I got some requests along the line: “why can’t I have LivePrompter remote control via Wifi without Cantabile?”. And, you know what? That makes a lot of sense! So if you want to control your band members’ LivePrompter tablets from yours, this is the way to go!
Note: There is one essential thing you need: have all your LivePrompter devices on the same wireless network – so you’ll need to bring a Wifi router to your gig and connect all your LivePrompter devices to it.
How it works
Essentially, to use LP connect, all you need to do is connect all your devices to the same Wifi network, make one of them “Master” and the others “Slaves”. Now the master will send the following information to all slaves as a “broadcast”:
- Song changes (these are communicated via the file name of the song (without the “.txt”) – so you can even use that with different song files from different sources, as long as the file names are the same. Watch for upper/lower case differences!
- Play/Pause commands (also from using the “universal key”)
- Up/Down commands
- Reset Song commands
For each slave device, you can define which information it will react to and which it will ignore, so if some of your band members want to keep a bit of control to themselves, this can be accommodated…
Note: all information is sent by the master device as a “fire-and-forget”-broadcast – it doesn’t verify if the slaves receive it and what they do with it. So as a “master operator”, you have no guarantee that all slaves really follow the master (wifi networks can be finicky) – use at your own risk…
Setting it up
OK, head to LivePrompter’s settings page and tap “LP Connect”. Now first set up the fundamentals at the top of the page.
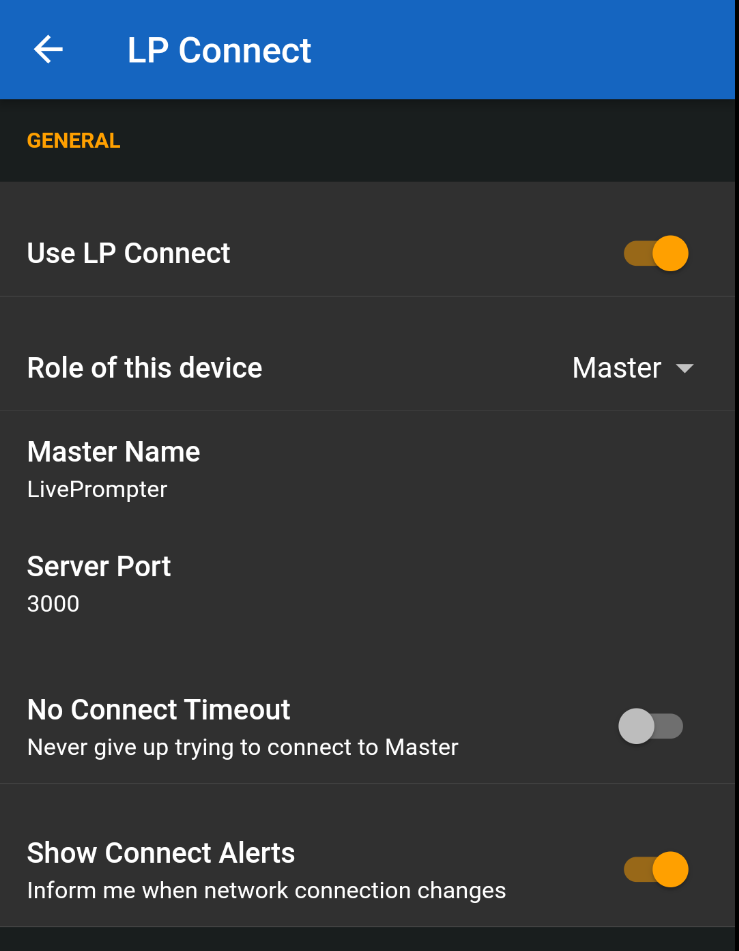
- Use LP Connect: turn the network connection on or off. Nothing will happen if you don’t turn this on 😉.
- Role of this device: Select “Master” or “Slave”. You can have multiple slaves listening to one master – but don’t try setting up two or more masters; this will mess everything up and cause chaos.
- Master Name: this identifies the master and needs to be set to the same both on the Master and the Slave devices – this is how slaves identify which master to listen to. So you actually can have more than one master – in that case these masters need to have different names, and for each slave, you’ll need to decide which master to listen to. Think of it as different departments… But normally, just leave this as it is and you’ll be fine as long as you don’t want to be tricky…
- Server Port: this is a setting you only need to make on the master (the slaves will automatically find the correct port). In most cases, you can leave this value as it is, unless you have some other service going on on port 3000.
- No Connect Timeout: if you set this to “off”, slaves will stop trying to connect to their master after two minutes of trying and simply display a “network disconnected” symbol to notify that something is wrong. If set to “on”, slaves will keep trying forever.
- Show Connect Alerts: when this is set to “on”, you will get some status message popups when connections are made or services started. This can help during initial experimentation and setup – once everything is running smoothly, you can turn it off.
Now you should be able to start a Master device and connect slaves to it. BTW: there’s no need to worry about which one to start first: the slaves will start looking for their master once they’re started, and they’ll discover it automatically once the master comes online – or if it is already there.
Please note: once you open the Settings Page, the network will be disconnected, and then later be re-connected when you return from Settings. Slaves will notice the disconnect and try to automatically re-connect – either for 2 minutes or forever, depending on “No Connect Timeout”.
Slave settings
For slaves, you can decide which commands from the master they will accept:

- Change Song: this is probably the most commonly used remote function – whenever the master device opens a new song, the slave will follow.
The mechanism to select the correct song on the slave device is the song’s file name (not the title!), but without its extension (.txt). So if you are using the same source, you should be fine; if you are using different sources on master vs. slave (e.g. you have a specific source for drum charts for your drummer), make sure that filenames are identical (and respect upper/lower case)!- Note: in setlists, “Change Song” will also jump to section headers or comments – it will identify them by their title. If you have multiple comments with the same title (e.g. “Announcement”) in one setlist, this may confuse LivePrompter – the slave will then always jump to the first such comment. That’s just the way it works… The same will happen if you have a song in your setlist multiple times.
- Change Setlist to “All Songs” if needed: initially slaves will look for a song within the currently loaded setlist when the master tells them to change to a new song. If this song can’t be found within the current set list, but exists in “All Songs”, LivePrompter will automatically load the “All Songs” setlist on the slave device and switch to that song.
- Follow Play/Pause: when “Play/Pause” is pressed on the master or a universal key triggers a play or pause command, the slave will also play/pause.
- Follow Up/Down: when a Scroll Up or Scroll Down is executed on the master, the slave will also do a similar scroll.
- Note: different screen geometries, font sizes or custom comments can make the outcome on the slave side very different from the master, so I generally leave this one set to “off”.
- Follow Reset: when the master resets to the start of the song, the slave will do this too.
Network status
LivePrompter will display the status of its network connection in its title bar (Home Page and Song Page).
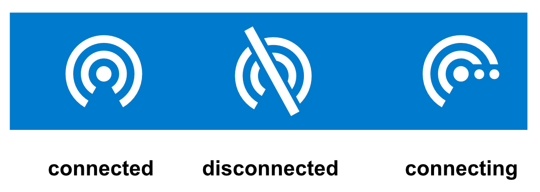
Depending on the device’s role (master or slave) this can mean different things; for the master role, only two states exist:
- connected: master has successfully started its network service
- disconnected: LivePrompter has not been able to start the network master service (maybe no network connection or flight mode activated?)
For the slave role:
- connected: slave has successfully connected to its master and is listening for commands
- disconnected: slave has not been able to connect or re-connect with its master for more than 2 minutes (depending on “No Timeout” setting); tap the icon to try again
- connecting: slave is currently trying to connect to its master, but hasn’t succeeded yet
You can tap the connection status icon to reset the network connection – this can be helpful if the connection has become unstable; try restarting the connection at the master or for individual slaves.